Deploying on AWS a container-based application with deep learning on GPU
This post follows my first technical post which presented the system I am trying to build. All code is available on github.
In this post, I will present an answer to the following problem: How can we deploy an application which:
- uses deep learning and GPUs
- is interfaced with the rest of the system (ie S3 and DynamoDB)
- is decoupled, reactive and serverless
The use-case here is to deploy an application which detects people in video files.
There are a few possible ways to tackle this problem, but the constraints of using GPUs limits the usable services of AWS for calculation to EC2 (p* instances) or Sagemaker. The solution we will explore here will be based on EC2.
Deep Learning requires usually several tools and models to be available for the solution to run correctly. This can be quite cumbersome to install, and makes it a problem when we turn to on-demand computing : each time you start an instance, you have to re-install everything, which creates a high overhead. Two solutions exist: create a custom AMI which will be used to launch instances, or use containers, which can run on existing AMIs. Using containers is the solution we will keep :
- easy to create
- can run both locally and remotely
- versionable
- allows you to control the environment.
To deploy containers on amazon, you need to use ECS (Elastic Container Service), which is managing the run of containers. It is coupled to ECR (Elastic Container Registry), which stores your docker images for deployment. ECS can run in 2 modes : EC2 cluster, and Fargate. Fargate is a serverless container management service, in which you do not need to manage the EC2 instances on which containers will run, and which you pay by runtime of the containers. It is a great solution, but unfortunately does not support GPUs at the moment (support seems to be coming for the end of 2019). We will thus use the EC2 mode.
In this post, I will first explain how to deploy a container on ECS with a gpu, then explain how to make the application react to events in the DynamoDB table.
Deploying a container on a EC2 cluster
Creating the cluster
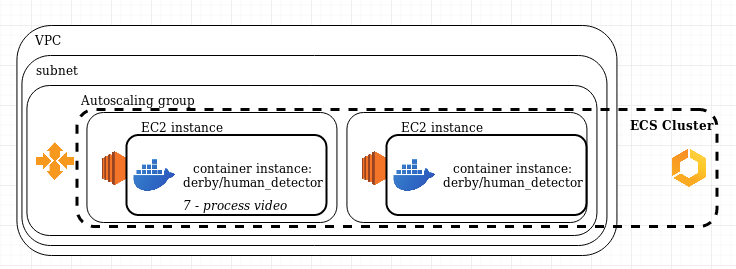
A cluster is a group of EC2 instances that are declared as members of a same group. To create a cluster, you need to have :
- A VPC, with at least a subnet, if necessary an Internet gateway to provide Internet access to the instances, and all necessary route mappings for the network
- one EC2 instance in the subnet
If you want to make it secure, you can either:
- declare the subnet private, but you won’t be able to ssh into the instance
- create 2 subnets, 1 public and 1 private, put the instances in the private and add a bastion host in the public one which will be used as ssh entrypoint for access to instances. For simplicity, here we will only use a public subnet, which will allow direct ssh to the instances.
To make it scalable and reactive, we will add an autoscaling group which role will be to launch and terminate instances. This will avoid having to manage them ourselves.
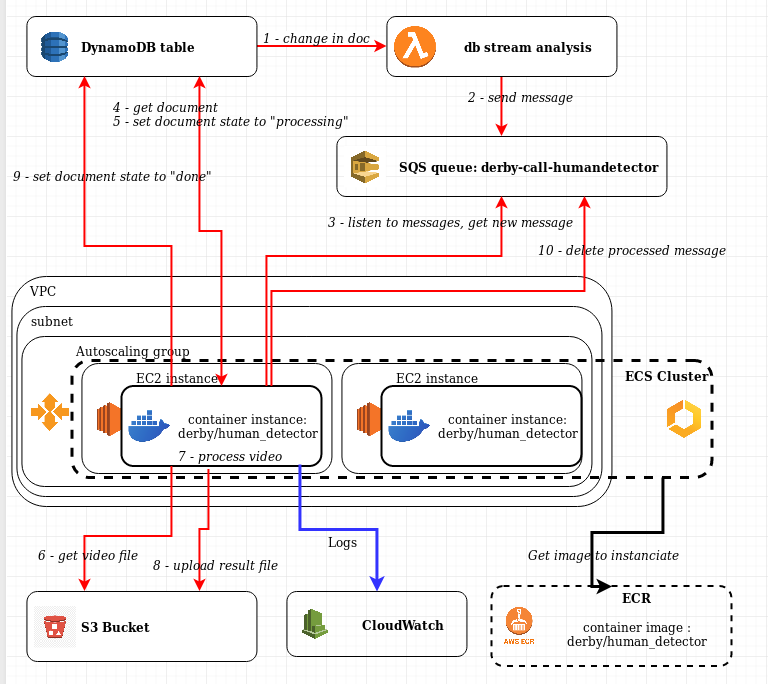
The architecture is thus :
Finally, we need to create all the IAM roles and attribute them to the various elements of the system.
There are 2 ways of creating everything:
- by hand
- by “infrastructure as code”
The system is small, but already complex, and creating everything by hand is doable, but long and with a high probability of missing important things.
Infrastructure as code, on the other hand, allows to have a simple overview of the whole system, to make relations between elements simple, and to track changes. The service AWS CloudFormation allows to create “stacks”, ie systems, from code templates, and to manage the whole stack from a single place (in particular, recreate or delete everything in the system)
You can find the template creating the system I presented in the ecs-cluster-def.yml file at the root of the Derby project.
Tricks to know
There are a few points that are interesting to know when deploying a EC2-based cluster. In particular, since we don’t want to manage by hand the instances deployed, a important tool is the Launch Configuration, which is the description of what the autoscaling group can launch when needed. Two points are useful to know:
-
how to allow ssh connection to instances : this requires a few steps, but is particularly useful when you’re trying to understand what is happening when running your containers (in particular if no log is coming to cloudwatch). The steps to perform are:
- create a network security group allowing ssh connection in and out (port 22)
- create a ssh key in the network & security part of EC2 service, save it locally to be able to use it
- put the name of the key in the KeyName parameter of the launch configuration, and the name of the security group in SecurityGroups
-
How to allow the instance to signal the rest of the system (ie the autoscaling group and the cluster) that it is ready. This is done by passing a script in the UserData parameter of the launch configuration
1 2 3 4 5 6 7 8 9 10 | #!/bin/bash -x # Install the files and packages from the metadatasudo mkdir /etc/ecs/ sudo chmod 777 /etc/ecs/ echo ECS_CLUSTER=${ECSCluster} >> /etc/ecs/ecs.config # Signal the status from cfn-init yum install -y aws-cfn-bootstrap /opt/aws/bin/cfn-signal -e $? --stack ${AWS::StackName} --resource ECSGPUAutoScalingGroup --region ${AWS::Region} |
This script first writes in a configfile that can be read by ECS that the instance is in a cluster, then uses an aws lib to signal the autoscaling group. If any of these 2 actions fails, the cluster won’t find the instance and won’t use it to deploy containers.
This leads to the following launch configuration descriptor :
1 2 3 4 5 6 7 8 9 10 11 12 13 14 15 16 17 18 19 20 21 22 23 24 25 26 27 28 29 30 31 32 33 34 35 36 37 38 39 40 41 42 43 44 45 46 47 48 49 50 51 52 53 | ContainerSecurityGroup: Type: AWS::EC2::SecurityGroup Properties: GroupDescription: Access to the ECS hosts that run containers VpcId: !Ref 'VPC' SecurityGroupIngress: - IpProtocol: tcp FromPort: 22 ToPort: 22 CidrIp: 0.0.0.0/0 GPUContainerInstances: Type: AWS::AutoScaling::LaunchConfiguration Properties: ImageId: !Ref 'ECSGPUAMI' SecurityGroups: [!Ref 'ContainerSecurityGroup'] InstanceType: !Ref 'GPUInstanceType' IamInstanceProfile: !Ref 'GPUEC2InstanceProfile' KeyName: !Ref 'KeyName' UserData: !Base64 'Fn::Join': - '' - - | #!/bin/bash -x - | # Install the files and packages from the metadata - sudo mkdir /etc/ecs/ - sudo chmod 777 /etc/ecs/ - |+ - | - 'echo ECS_CLUSTER=' - !Ref 'ECSCluster' - ' >> /etc/ecs/ecs.config ' - |+ - | - 'yum install -y aws-cfn-bootstrap' - |+ - | # Signal the status from cfn-init - '/opt/aws/bin/cfn-signal -e $? ' - ' --stack ' - !Ref 'AWS::StackName' - ' --resource ECSGPUAutoScalingGroup ' - ' --region ' - !Ref 'AWS::Region' - |+ GPUEC2InstanceProfile: Type: AWS::IAM::InstanceProfile Properties: Path: / Roles: [!Ref 'EC2Role'] |
Creating the Container image and making it available
Creating the image
If you’re not familiar with docker, I recommend taking a tutorial on the subject.
Here we create a very simple docker image. It uses as base image tensorflow/tensorflow:1.12.0-gpu-py3, which is provided by tensorflow. It contains python 3 and tensorflow-gpu 1.12 with CUDA 9 installed. We copy the code in the image, then install the python requirements and download the models. Finally, we declare which script will serve as entrypoint.
You can find the file in the project at human_detector/Dockerfile
If you want to test it locally, you will need to launch it with the nvidia runtime (which maps the gpu of your computer in the container) and mount your ~/.aws directory to allow the container to use your aws credentials.
Uploading the image
The next step is to make your image available to the cluster by hosting it on AWS ECR.
For this you need to :
- create a repository in ECR (ie a naming convention that will group all versions of a same docker image) (you only have to do it once)
- tag the image with the name of this repository (and a version, or “latest”)
- use docker to connect to the repository and push your image on it.
You should find that the repository now contains one more image.
IMPORTANT: you pay ECR by the storage capacity used, and the free tier is very small. If you’re not using an image, delete it to avoid paying for storage.
Describing the task and running it
You now have a cluster running with at least one EC2 instance, and an image of your container available to the cluster.
We now need to describe to the cluster what to run: this is the task description.
{
    "family": "derbyHumanDetectionTask",
    "requiresCompatibilities":["EC2"],
    "executionRoleArn": ...
    "taskRoleArn": ...
    "placementConstraints": [
        {
            "expression": "attribute:ecs.instance-type == p2.xlarge",
            "type": "memberOf"
        }
    ],
    "cpu": "2048",
    "memory": "2048",
    "containerDefinitions": [
        {
            "name": "derbyHumanDetectionTask",
            "essential": true,
            "image": "name of the image in ECR",
            "resourceRequirements": [
                {
                    "type": "GPU",
                    "value": "1"
                }
            ],
            "logConfiguration": {
                "logDriver": "awslogs",
                "options": {
                    "awslogs-group": "/ecs/derby-human-detection",
                    "awslogs-region": "eu-west-1",
                    "awslogs-stream-prefix": "ecs"
                }
            }
        }
    ]
}
In this description:
- “family” is the name of the task. It in fact covers the fact that what you push is not a task, but a revision of a task. Family is the group of all revisions of the task
- IAM roles are separated between execution role (which is used by the instance to launch the container) and the task role (which is used by the container to interact with other services)
- placement constraints are what actually enforces the fact that you want a GPU available, BUT it only does that: ensure that the instance that launches the container has a gpu, not that it is available to the container
- resource requirements is what tells the cluster to use the nvidia runtime to launch the container, which is what makes a gpu available to the container.
- finally, using the awslogs driver makes the logs of your container go to cloudwatch, which is very useful to monitor what is going on. awslogs will send everything that prints on stdout and stderr in your container, so make sure you log to these streams
IMPORTANT : you need both the placement constraints and the resource requirements to enable your container to use the GPU.
Once the description pushed to ECS, you can either run it by hand in your cluster, or use “aws ecs run-task” command line tool.
You can also define a Service, which is a controller for tasks (quite similar to what autoscaling is for EC2 instances). We won’t cover that here.
You can find all files relative to these operations in the human_detector directory.
Creating the deep learning application
Now that we know how to deploy a container which can actually use a GPU, we can create the app we want.
Making the app available
It needs to have access to DynamoDB and S3, and be callable by the rest of the system. For this we will use a SQS (Simple Queue Service) queue from which the container will poll messages. SQS is a great tool to decouple the architecture : the messages stay in the queue as long as they have not been processed, and if you need to process more messages, you just launch more instances in your cluster and more tasks. This can even be automated, as autoscaling groups and ecs services can be configured to use triggers based on the size of the SQS queues.
Call the app automatically
The final point is how to automatically call the app when needed, ie when a new video has been uploaded and split in smaller videos (see previous post). For this, there is a solution provided by DynamoDB : streams. Streams can be configured to send every changes made to the table to various destination, but in particular to lambda functions.
We thus create a lambda function which will get the streams from our table in dynamoDB, analyze the new state of the item, and if necessary send messages in relevant queues so that the apps can process the video.
In the documents, current state is tracked as follow :
[
    { "M" : {
        "state" : { "S" : "done" },
        "step" : { "S" : "timesplit" }
        }
    },
    { "M" : {
        "result_file" : { "M" : {
            "bucket" : { "S" : "cp-derby-bucket" },
            "key" : { "S" : "project/derby_testmatch_1_firstjam/human_detection/derby_testmatch_1_firstjam_2.json" }
            }
        },
        "state" : { "S" : "done" },
        "step" : { "S" : "human_detector" }
    }
]
if the lambda detects that the last step in the list is in state “done”, it sends a message to the queue for the next step in the list of steps.
This lambda can be found in the awsQueueManagement directory
Complete architecture
The code
The code itself is not complicated, you can find it in human_detector/src. The main elements are:
- the Detector class, a base class for all the detectors implemented
- a factory for detectors
- the HumanDetector and FaceDetector, which both load a trained TF model and apply it to single images
- the VideoAnalyzer class, which instantiate detectors, open a video and call the detectors on a frame-by-frame basis
- the aws_interface.py file, which is the entry point of the app. It manages all interactions with s3 and dynamoDB. When it receives a message, it:
- gets the relevant doc from DynamoDB
- sets its state to “running”
- gets the video from s3
- calls the video analyzer on it
- pushes a result file to s3
- sets the state of the doc to “done” in dynamoDB
Due to the size of the result file, we have to store them on s3. DynamoDB is not made for handling lots of information in a same doc, and is currently limited to 1Mo documents.
Conclusion
In this post, I showed how it is possible to deploy a docker-based application using gpu on AWS. It involves quite a few services, which I could not present in details here.
If some parts seem unclear, don’t hesitate to check the code on my github repository, I tried to make the documentation as complete as possible (both in the code and in the wiki).
In the next post, I will try to make a more data-science oriented presentation, as this one was more devOps oriented.
If you have thoughts or ideas on how to make the architecture better, if you have better implementation ideas, or just if you have recommendations about these technical posts, please leave a comment!
2 Responses
Hi Cyril,
Great post.
I think EKS might be worth mentioning. It is the only solution I know of that late you auto scale your group to 0. It is well worth it if you don’t have a continue workload. GPU instances are expensive.
Hi Etienne
It is possible to autoscale my solution to 0: set the autoscaling group min instance to 0, then play with triggers to remove running instances when there are no message in a given SQS queue for more than a threshold time (example here)
You are right, EKS is a solution worth mentioning. I did not because to be honest I have absolutely no knowledge of Kubernetes. In my mind Kubernetes requires more work and knowledge than what I presented here (my cluster is here just a necessary tool), but then I might be wrong.